GuidesConvert negatives into photos
How to convert film negatives into photos
To convert a film negative to a positive, you invert the scan, remove the orange mask, set a black point and a white point for each colour channel, and then apply a tone curve. A plain invert comes close only with black and white film. Colour negative needs all four steps, and slide film needs no inversion at all.
What you need
- A scan of the negative. A camera RAW file is best, because it holds the most data. A 16-bit TIFF from a film scanner also works. If you have not scanned yet, start with how to scan film with a camera.
- A little clear film in the frame: the gap between two frames, or the strip along the sprocket holes. This is the film base. You measure the orange mask on it.
- The same scan exposure, light and white balance for every frame of a roll. Set the camera to manual, as in exposure, white balance and RAW settings for film scans.
- Software: an editor with Levels or Curves for each channel, or a dedicated converter.
What a conversion does
Every converter, manual or automatic, does four jobs. Each job fixes a different problem. Many tools remove the mask just before they invert, but the result is the same.
| Step | What it fixes | If you skip it |
|---|---|---|
| Invert | Dark becomes light, light becomes dark | You still see a negative |
| Remove the orange mask | The colour of the film base | A strong blue or cyan cast |
| Black and white points per channel | Each channel’s own range | A flat picture, with a cast that changes from shadows to highlights |
| Tone curve | Contrast, like a print | A grey, low-contrast picture |
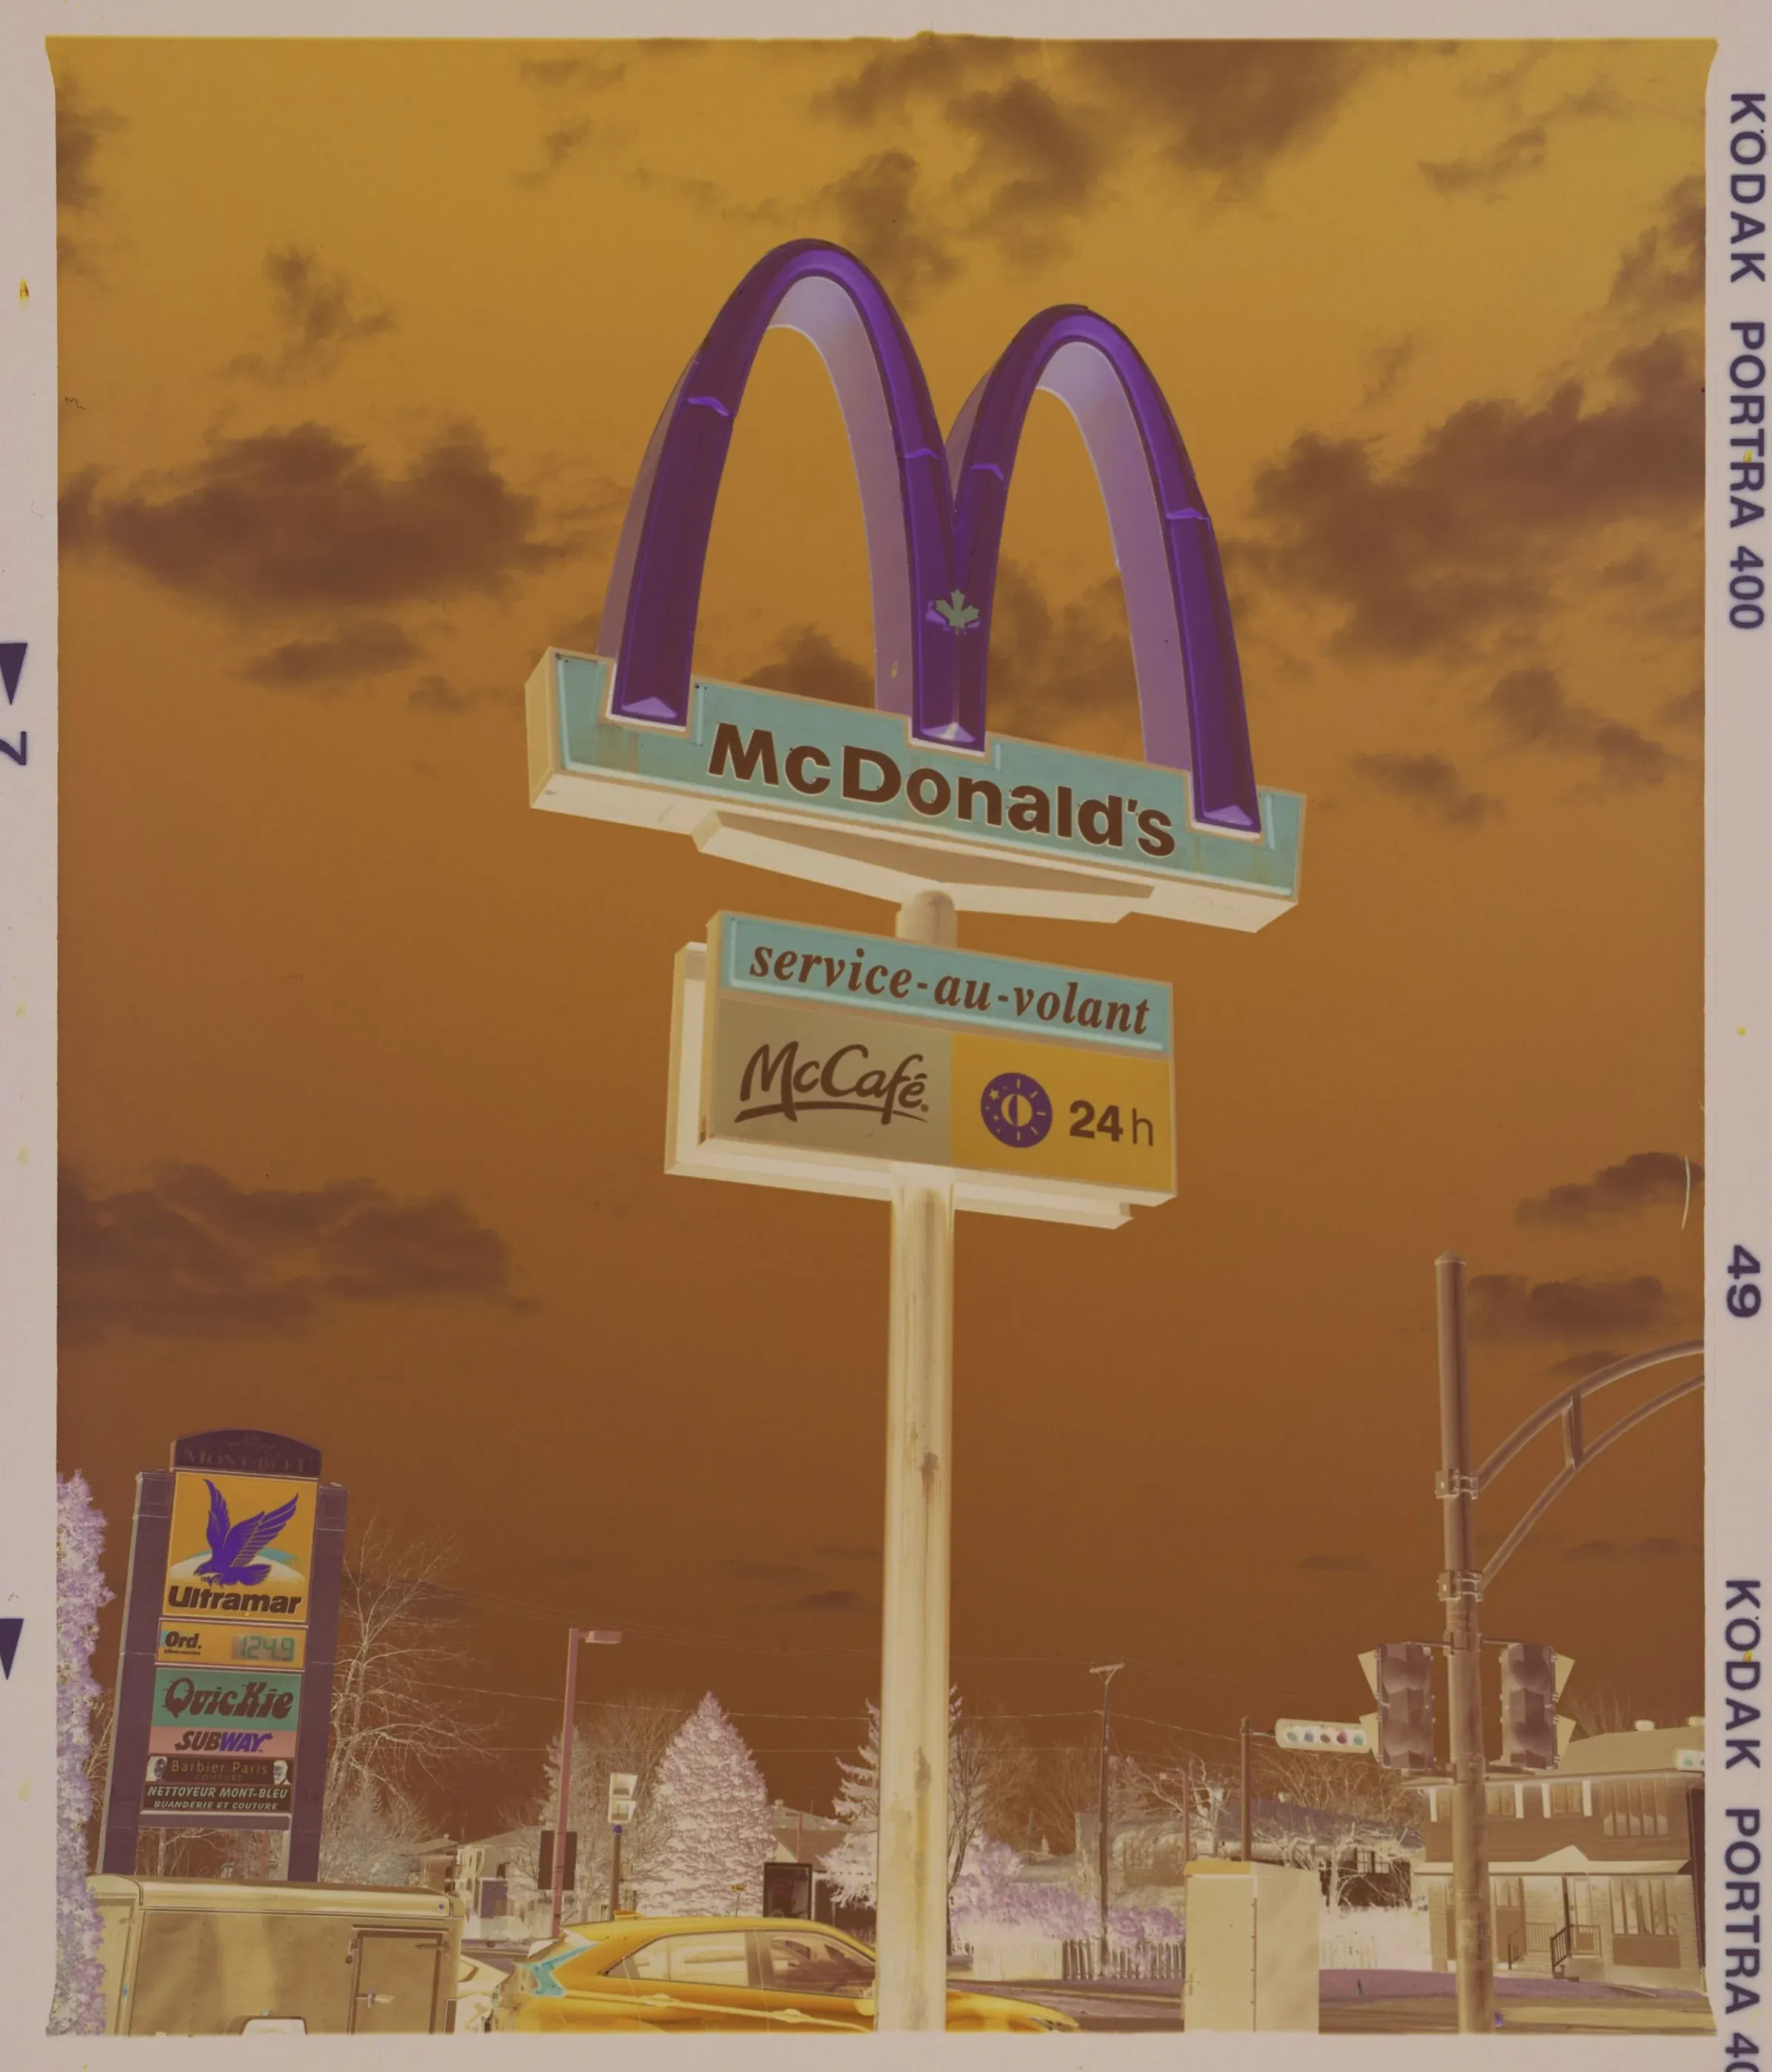 1 · Scan
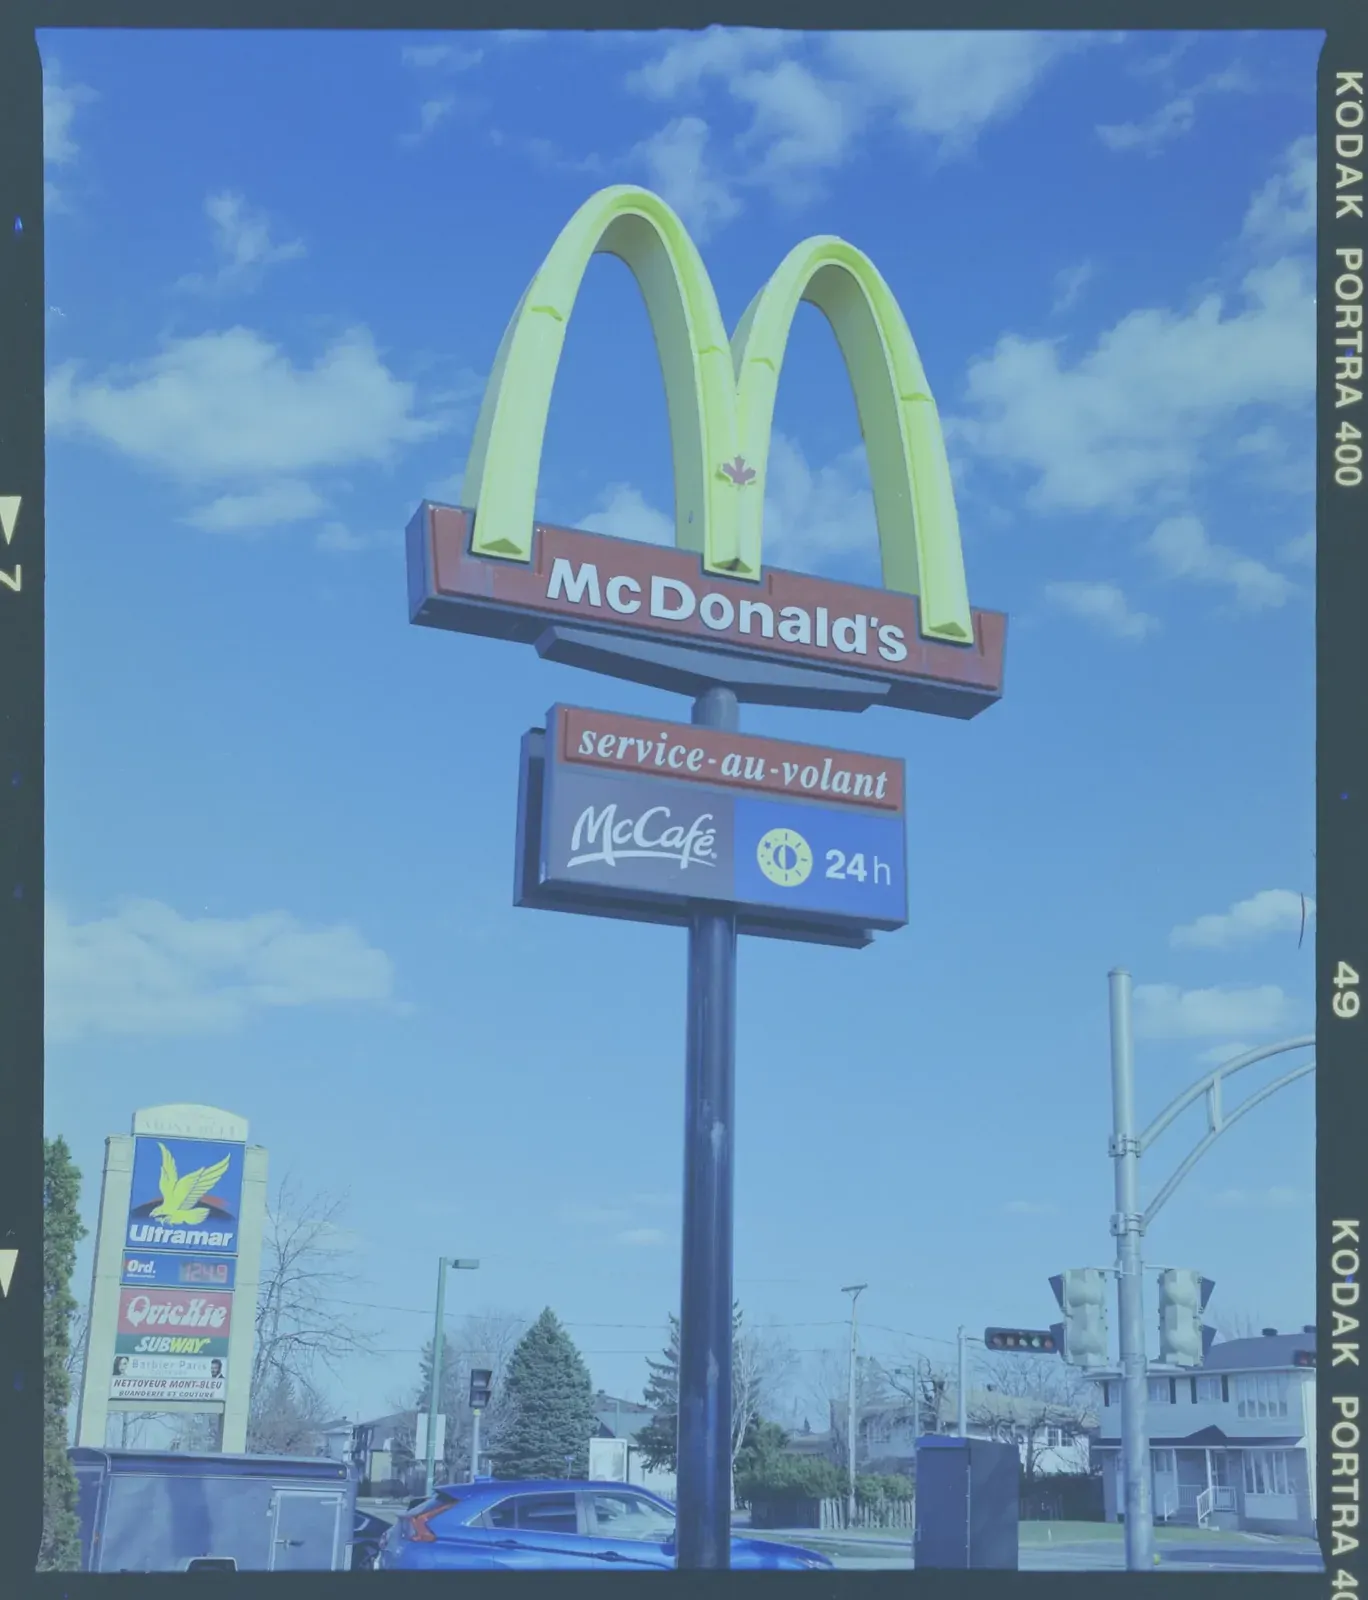 2 · Plain invert
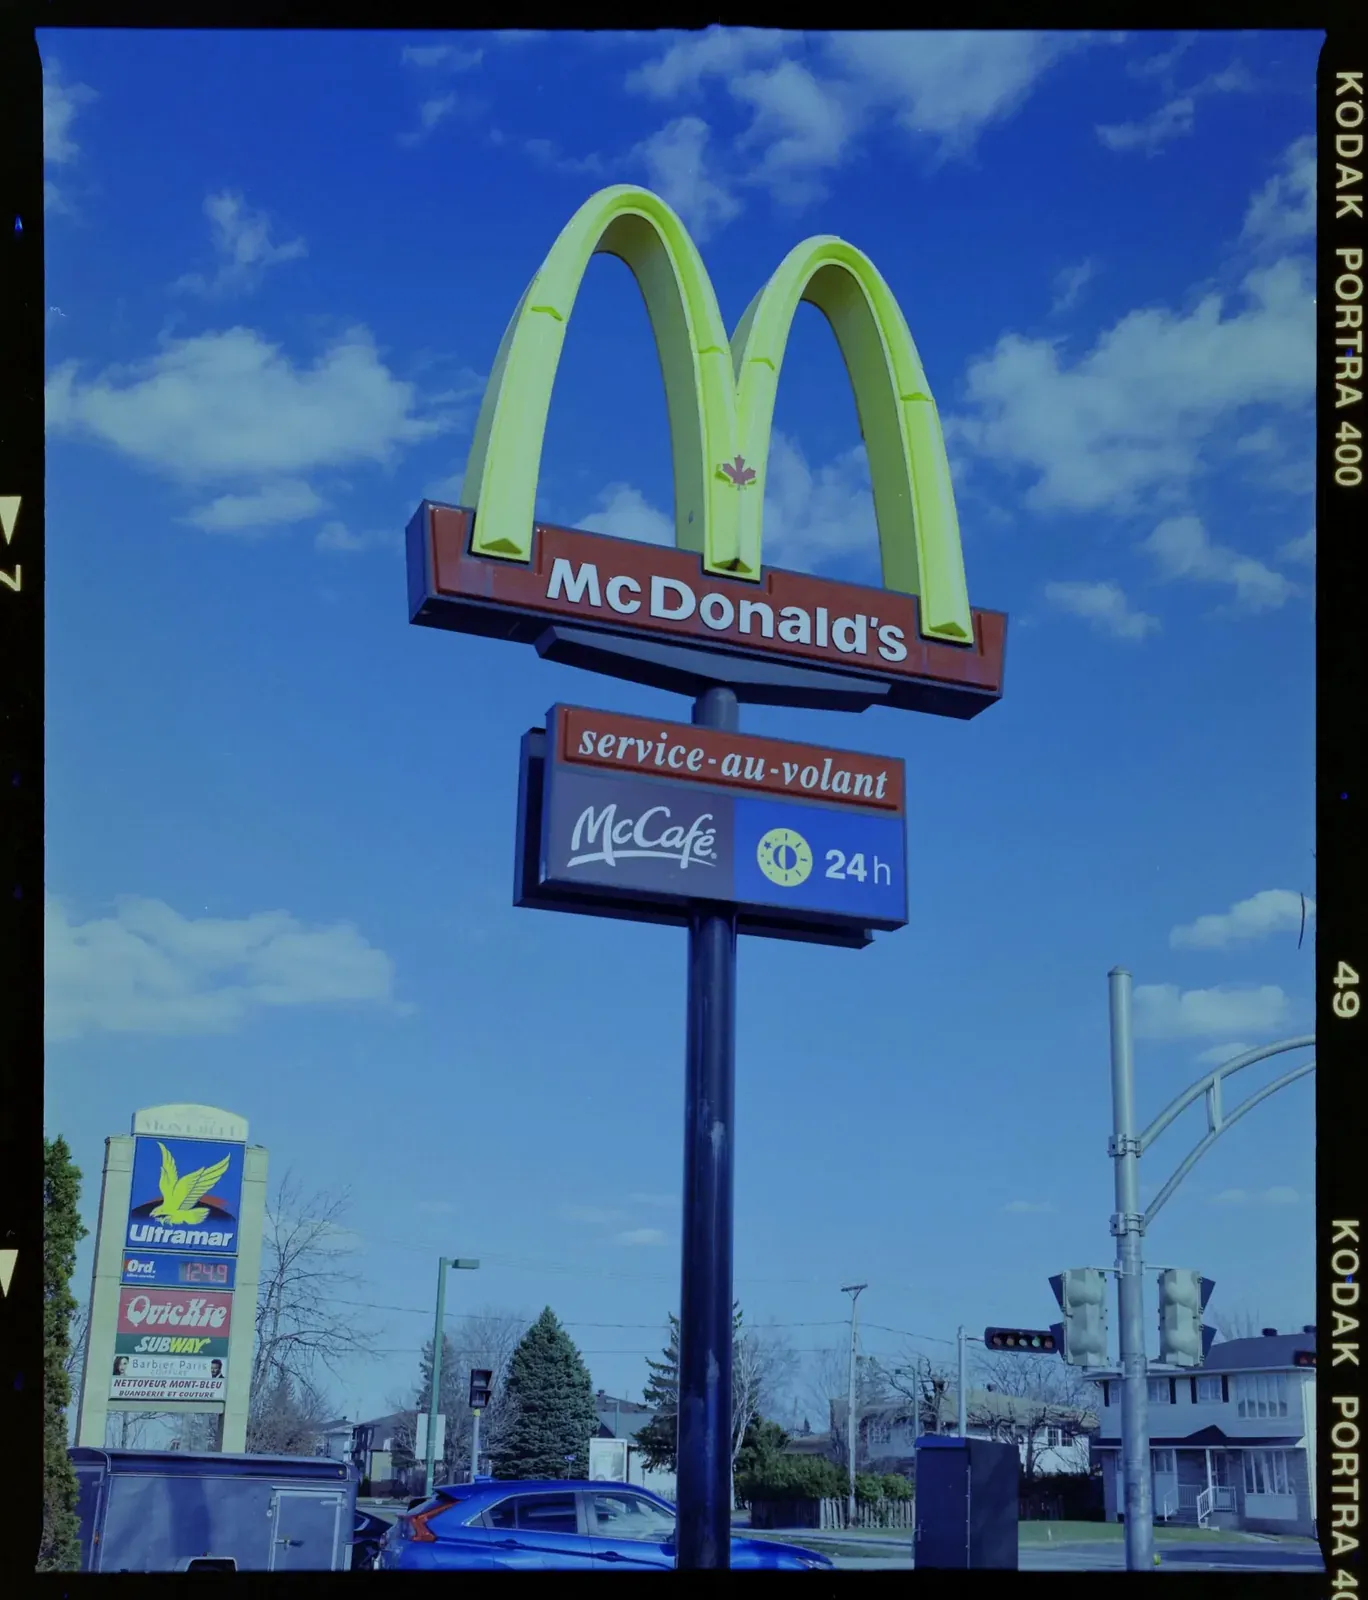 3 · Mask removed
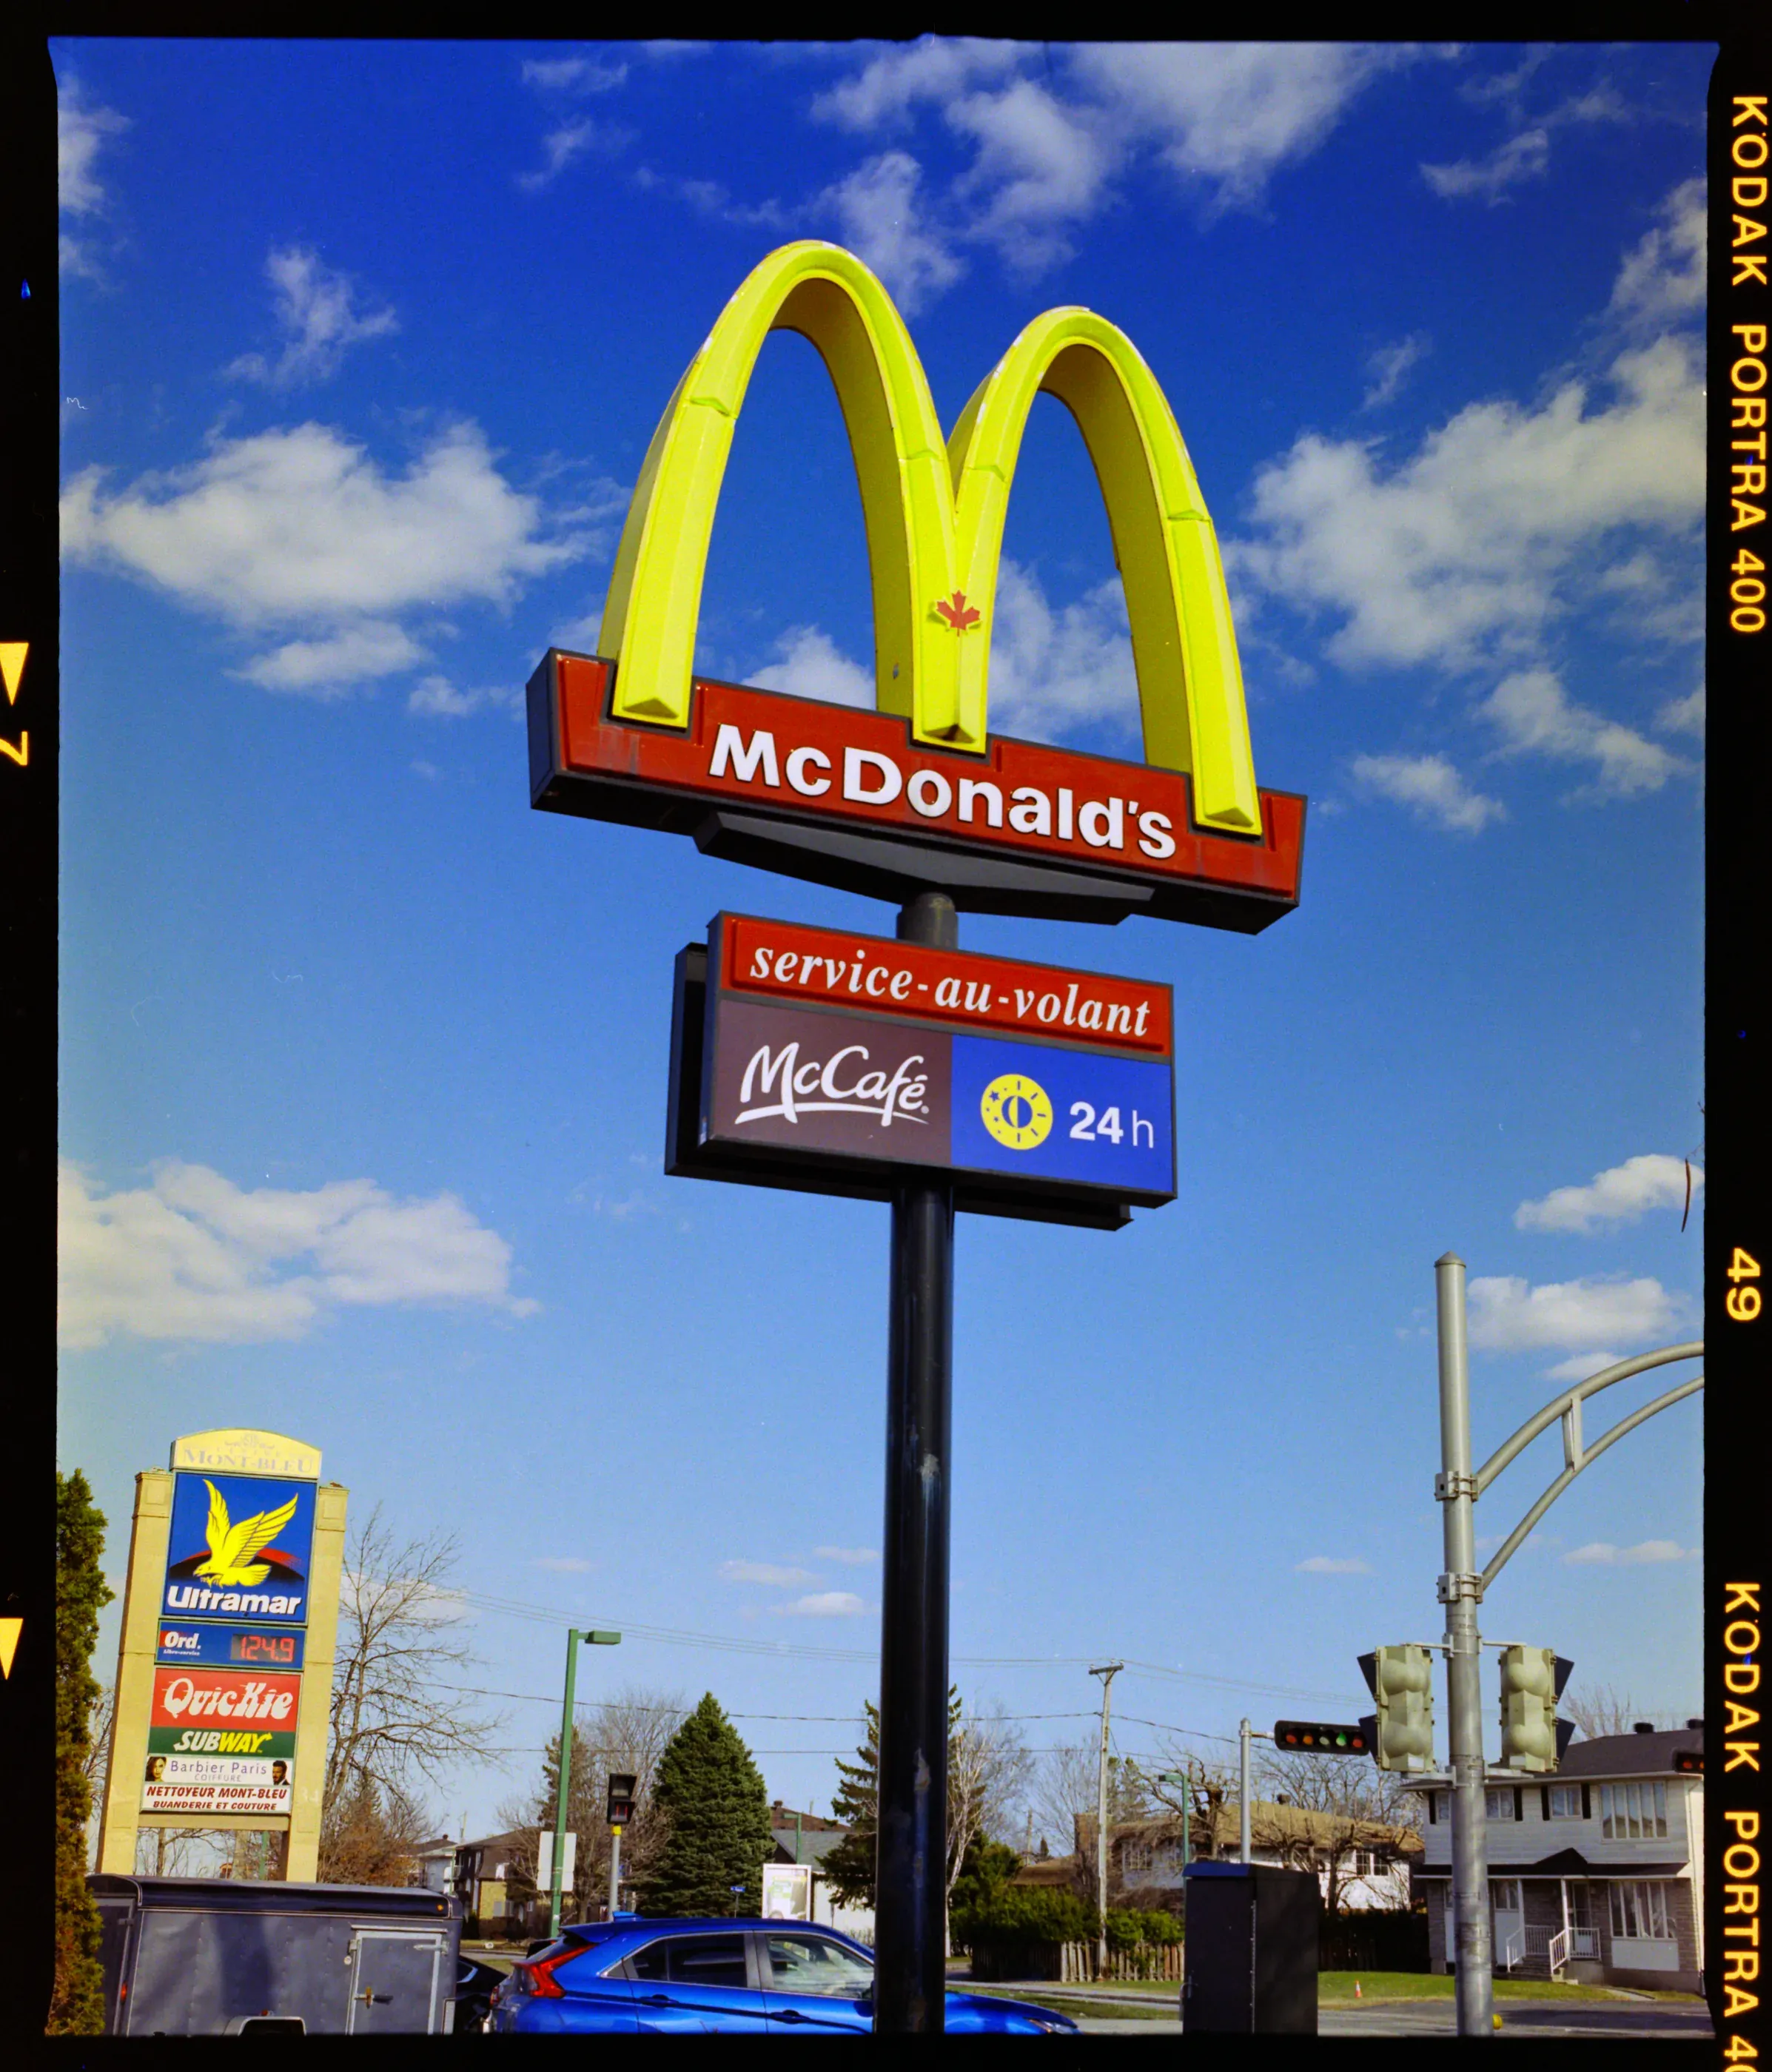 4 · Finished
One frame of Kodak Portra 400 at each step. The plain invert turns the orange mask into a blue cast. With the film base divided out, the edge goes black, but the three channels still use different ranges, so the cast stays in the midtones. The finished frame has its points set per channel and a tone curve: Monobath, with the Everyday 200 profile.
1. Invert
A negative stores light as density. Where the scene was bright, the film is dark. Where the scene was dark, the film is almost clear. The invert turns this around, so that the clear film base becomes the darkest part of the picture.
For black and white film, an invert gives you a recognizable picture, but it is flat. For colour film, it gives you a deep blue picture. The next steps fix both.
2. Remove the orange mask
Colour negative film has an orange tint, called the mask. It is part of the film’s design: it corrects for the dyes’ unwanted absorption, so that prints from the negative have cleaner colour. The mask is densest in blue, then in green, then in red. You can see it in the Kodak Portra 400 data sheet: at the lowest exposure, the blue curve starts highest, then green, then red.
After a plain invert, the orange becomes a strong blue-cyan cast. To remove the mask, you make the film base neutral. There are two common ways:
- White balance on the film base in your RAW converter, before you invert. Click the clear film with the white balance tool.
- Divide the picture by the colour of the film base. In Photoshop, Affinity or GIMP, this is a layer filled with the base colour, in the Divide blend mode.
Both ways make the film base grey or white. After the invert, the base is black or near black, and the cast is gone from the shadows. The midtones and highlights can still lean blue until you set the points in step 3.
3. Set black and white points per channel
After the mask is gone, the picture still uses only part of the tonal range. Each colour channel also uses a different part. The dyes absorb light differently, and your camera’s red, green and blue filters see them differently. So each channel needs its own black point and its own white point.
- Black point: the darkest shadow of the picture. In the negative, this is the thinnest area, close to the density of the film base.
- White point: the brightest highlight that must keep detail. In the negative, this is the densest area.
Set each point a little outside the real data, so that you do not clip the deepest shadows or the brightest highlights. When the three channels have matching points, grey objects are grey in the shadows and in the highlights.
Good tools also set a midtone balance (a gamma) for each channel. The response of film is not a straight line, so a cast can stay in the midtones when the end points are correct.
4. Apply a tone curve
Negative film records a long range of brightness at low contrast. This is why a correct negative looks flat after you only invert it. In the darkroom, the paper adds the contrast back. Its curve has a toe in the shadows and a shoulder in the highlights.
A tone curve does the same job on screen. It sets the overall contrast and decides how the shadows and highlights roll off. Most of the look of a conversion comes from this curve. A flat curve keeps every tone for your own edit. A steeper S-curve gives a finished, print-like picture.
Three of the tone curves in Monobath, each on a different frame. Reference 100 is almost straight and keeps every tone for your edit. Everyday 200 is a gentle S, like a print. Vivid 100 is a steeper S, for more contrast. The dashed line is no change.
Colour negative, black and white and slide
The three film types need different steps.
| Film | Process | Invert | Orange mask | Points | Main difficulty |
|---|---|---|---|---|---|
| Colour negative | C-41 | Yes | Yes | Three sets, one per channel | The mask and colour casts |
| Black and white negative | Black and white | Yes | No | One set | Contrast and a slight base tint |
| Slide (positive) | E-6 | No | No | Per channel, for white balance | Dense shadows in the scan |
Colour negative
Colour negative needs all four steps. Colour casts are the most common problem, and most of them come from the mask or from channels with different points. Motion picture colour negative films (ECN-2) also carry an orange mask, and they convert the same way.
Black and white negative
Black and white film has no orange mask, and all three channels hold the same silver image. You invert, set one black point and one white point, and choose a curve.
A colour camera can still see a slight tint in the film base: grey, blue, or pink from dye that the wash did not remove. White balance on the film base, convert to greyscale, and the tint goes away. The details are in how to convert black and white negatives.
Ilford XP2 Super is a black and white film that you develop in C-41 chemistry. It has no orange mask, so convert it as a black and white negative.
Slide
A slide is already a positive, so there is nothing to invert. You set the white balance and the end points, and you can add a little contrast.
The difficulty is in the scan. Slides hold a long range of densities, and the darkest parts need a lot of light to show detail. Expose the scan so that the brightest parts of the slide just do not clip. See how to scan slides with a camera.
Settings per roll or per frame
All frames of a roll share the same film base, because the same film went through the same development. This gives you a choice.
Per frame: the converter measures each frame alone and stretches it to the full range. This is quick, and each frame looks good on its own. But a night scene and a snow scene both end up with the same full range of tones. The night gets lifted towards grey, and the snow gets pulled down. Colour can also drift from frame to frame, because each frame has different subject colours.
Per roll: you measure the film base once, set the channel balance on one well-exposed frame, and use the same settings for the whole roll. The differences between frames stay real, as on a contact sheet. Then you change only the brightness of the frames that need it.
A good way to work:
- Scan the whole roll with the same exposure, light and white balance.
- Measure the film base on the clear film of one frame.
- Convert one normal, well-exposed frame. Set its points and its curve.
- Copy the settings to every frame of the roll.
- Adjust brightness on the frames that need it.
- Use per-frame settings only for frames shot in very different light, for example indoors under tungsten on a daylight roll.
Per-roll settings need consistent scans. If you change the scan exposure between frames, the film base changes in the files too, and the copied settings no longer fit.
The manual way
You can convert in Photoshop, Affinity or GIMP with layers: a Divide layer for the mask, an Invert layer, Levels for each channel, and Curves. The full method, step by step, is in how to invert colour negatives in Photoshop.
The manual way costs nothing more if you already have the editor, and it teaches you what each step does. But it is slow for a whole roll, and it is hard to get the midtone colour right, because Levels and Curves do not model how film responds to light.
Free raw editors do part of the work for you. darktable has a module called negadoctor. You sample the film base, set the density range, and then set a virtual paper grade and gloss. RawTherapee has a Film Negative tool. You pick a light and a dark neutral spot once per roll, then copy the settings to the other frames. Both are free and read RAW files.
Dedicated tools
A dedicated converter does the four steps for you, measures each channel, and copies settings across a roll. The right one depends on what you already use:
- Lightroom Classic: conversion plugins run inside it.
- Capture One, ON1 Photo RAW or DxO FilmPack: each one now has negative conversion built in.
- No host app: standalone converters run on their own, with no other software.
For a full comparison, with platforms and pricing models, see negative conversion software compared, free and paid. If you use a Mac and do not want Lightroom, read how to convert negatives on a Mac without Lightroom.
Export formats and bit depth
Export for the next step. If you will still edit the picture, keep as much data as you can. If you will only share it, make a small file at the very end.
| Format | Bit depth | Use it for |
|---|---|---|
| TIFF with LZW or ZIP compression | 16-bit | Further edits, prints, your archive |
| PNG | 16-bit | Lossless files when an app does not take TIFF |
| JPEG | 8-bit | Sharing, the web, phones |
Why 16-bit: an 8-bit file has 256 levels per channel. A 16-bit file has 65,536. A conversion stretches the narrow range of the negative to the full range and then bends it with a curve. With 256 levels, more edits after that can show as banding in skies and other smooth tones. A 16-bit file has room for those edits. LZW and ZIP compression make the TIFF smaller and do not change any pixel.
Colour space: Display P3 and Adobe RGB hold more saturated colours than sRGB. Use one of them for files that you will still edit. Make an sRGB copy for the web.
Resolution: export at full resolution. You can make smaller copies later, but you cannot get detail back.
Keep your original scans. A good conversion is one that you can do again with different settings, years from now.
Common problems
- A strong blue or cyan cast: the mask is still there. Measure the film base on a clean part of the clear film, away from light leaks and the edge of the holder. More fixes are in colour casts and tints in film scans.
- A flat, grey picture: there is no tone curve, or the black and white points are too far outside the data. See why film scans look flat.
- Shadows in one colour, highlights in another: the channels do not have matching points or midtones. Fix each channel with Levels or Curves. White balance alone cannot fix a cast that changes with brightness.
- Frames of one roll do not match: you converted each frame alone, or the scan exposure changed during the roll. Use roll settings and a fixed scan exposure.
- Noisy shadows on colour negatives: the mask absorbs blue light, so the blue channel of the scan gets the least light. Expose the scan as bright as you can without clipping.
- Very thin or very dense negatives: see how to scan and convert thin or dense negatives.
- Dust spots: a conversion makes dust easier to see. See dust on film scans.